Showing posts with label post and beam. Show all posts

Dining in Style - Floor and Ceiling on Display

Posted: Tuesday, July 20, 2010
Well, here are my photos of The Tiles. Since I just took them, you'll have to keep in mind that there is a leap of three years happening between posts. (So things like stair wells and light fittings and tiny little leadlight windows into upper levels and such will have to be ignored!)

The floor from the lounge room/kitchen corner.


This floor was actually refinished about eighteen months ago because the original concrete crumbled heavily around the edges - especially along the join between concrete and timber that can be partially seen in the lower left corner of the above photo. Traffic over these two tiles is particularly high. But we refined our technique, innovating boldly, as usual, and used a large proportion of tile cement. This cement has much more flexibility and has consequently worn much less. The pale blotches that can be seen in the above photo are areas that we will soon patch again, but they are nothing in comparison to the first time round. These ones have been caused mainly by regular scraping by chair legs.

The floor before the big front windows.

From three years on, I guess it is appropriate to report that the concrete has really worked well all round (even if it did have some hitches at first). It is always a little cooler than anywhere else in summer, yet it is usually warmer than the timber floors in winter even after a night without a fire. (And the temperature can drop to minus seven in winter here. Mind you, not inside our house - any more.) The tiles have also worked reasonably well for a high traffic, hard wearing zone and for an eating area. Occasionally we've had to scrub a bit more to get food substances off, the concrete being more porous than your average linoleum, and it can be quite dusty. However, it absorbes moisture faster than our polished timber floors and can be classified overall 'easy maintenance'. Three cheers for Slick's innovative Tiles!
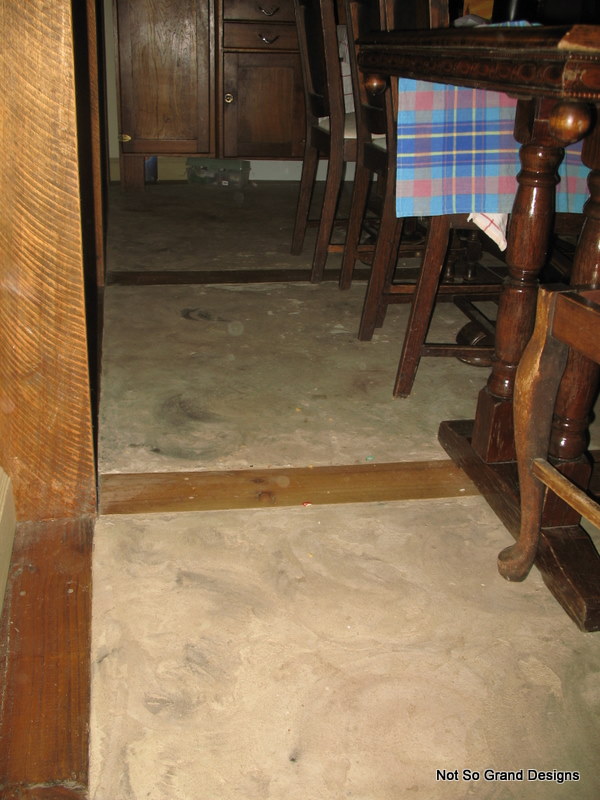
The floor in front of the windows looking toward the kitchen.


I thought I would also take the opportunity to show you the ceiling of the Dining Room, as we failed to take any photos at the time of construction.

Consisting entirely of untreated old palings, the neutral greys create a quietly dramatic contrast to the oiled post and beam framework.

I hope you don't get sea-sick looking at the photos. Often this ceiling attracts attention because of the tricks the pattern can play with people's perception. Despite appearances, the ceiling truly doesn't go up and down; it really is flat parallel to the floor!

The ceiling panels, looking from the lounge room/bathroom corner.


The ceiling panels, looking from the lounge room/bathroom corner; different setting.

I believe this was the first use of palings in the house. We have never regretted it in any way.

The ceiling panels, from within the dining room over by the cabinet.


The ceiling panels, looking from the lounge room.

Yes, those are the leadlights you're supposed to be ignoring. Obviously they lead into an room above the Dining Room, so I'll just finish up by telling you how we completed the ceiling.

Palings look great - but many of them are not up to bearing an adult's direct weight. (Not by the time we get them.) Distributed weight is a different matter, however. After laying black plastic (and tacking it with staples) on top of the palings, we screwed down sheets of plywood. Four, to be exact, and all lifted into the room before we closed the last section of ceiling.

And plywood the floor remains, to this point. By the time we added furniture (hold your horses, you'll see!) little of the floor could really be seen, so it has not been seen necessary to do more with it, though paint and tiles (conventional ones) have been suggested.

However, the Attic is a different story and a different post ...

Post and Beams

Posted: Monday, January 4, 2010
These photos were taken on the same day as the photos displayed in the previous post. It was the first of November, 2007.

In the above photo, taken from the lounge room, you can see the beginning of the process we were undertaking. Slick had measured and cut all the posts and beams, and screwed down the posts along the window wall. Up on our new scaffolding rested the long beam that would soon sit in its place on top of those posts. This beam, though it is hard to see in these photos, has holes cut ready for the shaped ends of the cross beams.

Click and Slick sitting on the scaffolding. (Above) Here Slick and I look as though we are lazing around, but I assure you that it is better to plan rather than rush into something and make stupid mistakes or even get hurt. 'Process, process!' is our catch-cry. Besides, we were psyching ourselves up for the effort ahead!
 Unscrewing the header.(Above) Here I am taking down the header beam that had been over the entryway into the dining room (or verandah, depending on how far back you want to go). As you can see, with the header up, part of the dividing wall remains between dining and lounge area. We had to remove that in order to put in place the new structure.

Showing the first beam.(Above) This time we are looking away from the kitchen, toward the area the bathroom used to inhabit. In the top left of this photo you can see that the long beam is in  place along the top of the windows. The timber on top of the scaffolding is supporting the first cross beam. You can see the shaped 'peg' at the end, ready for the other end beam.

Showing the end beam before it is attached to the cross beams.
 (Above) This photo is looking back toward the new bathroom (door on right) and kitchen (behind curtain on left), along the surface of the lower scaffold platform. The end beam is resting ready to be hammered onto the ends of the waiting cross beams.

 Showing the end beam in the process of being attached to the cross beams.
(Above) The end beam half on.

Showing a close-up of the final result.
(Above) The end result. Thank God for giving us that scaffolding, as it would have been much, much harder and way more dangerous without it.