Showing posts with label innovation. Show all posts

Dining in Style - Floor and Ceiling on Display

Posted: Tuesday, July 20, 2010
Well, here are my photos of The Tiles. Since I just took them, you'll have to keep in mind that there is a leap of three years happening between posts. (So things like stair wells and light fittings and tiny little leadlight windows into upper levels and such will have to be ignored!)

The floor from the lounge room/kitchen corner.


This floor was actually refinished about eighteen months ago because the original concrete crumbled heavily around the edges - especially along the join between concrete and timber that can be partially seen in the lower left corner of the above photo. Traffic over these two tiles is particularly high. But we refined our technique, innovating boldly, as usual, and used a large proportion of tile cement. This cement has much more flexibility and has consequently worn much less. The pale blotches that can be seen in the above photo are areas that we will soon patch again, but they are nothing in comparison to the first time round. These ones have been caused mainly by regular scraping by chair legs.

The floor before the big front windows.

From three years on, I guess it is appropriate to report that the concrete has really worked well all round (even if it did have some hitches at first). It is always a little cooler than anywhere else in summer, yet it is usually warmer than the timber floors in winter even after a night without a fire. (And the temperature can drop to minus seven in winter here. Mind you, not inside our house - any more.) The tiles have also worked reasonably well for a high traffic, hard wearing zone and for an eating area. Occasionally we've had to scrub a bit more to get food substances off, the concrete being more porous than your average linoleum, and it can be quite dusty. However, it absorbes moisture faster than our polished timber floors and can be classified overall 'easy maintenance'. Three cheers for Slick's innovative Tiles!
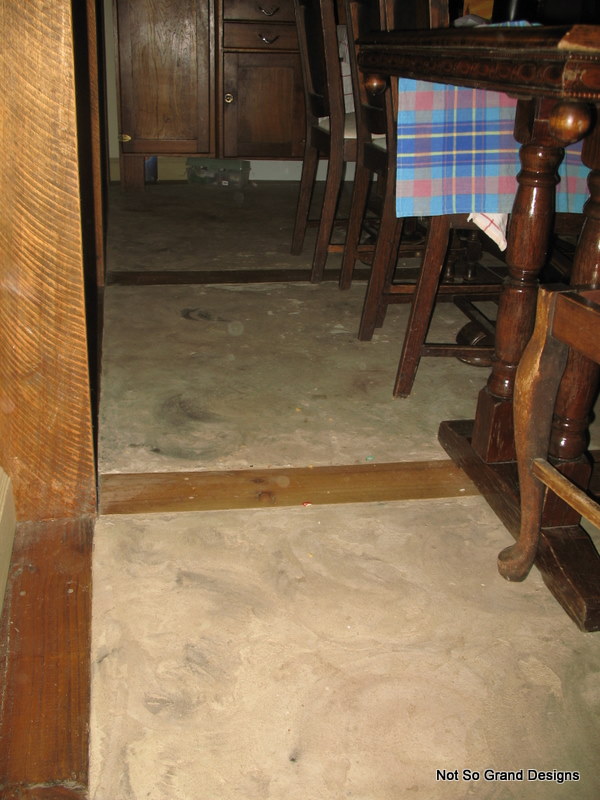
The floor in front of the windows looking toward the kitchen.


I thought I would also take the opportunity to show you the ceiling of the Dining Room, as we failed to take any photos at the time of construction.

Consisting entirely of untreated old palings, the neutral greys create a quietly dramatic contrast to the oiled post and beam framework.

I hope you don't get sea-sick looking at the photos. Often this ceiling attracts attention because of the tricks the pattern can play with people's perception. Despite appearances, the ceiling truly doesn't go up and down; it really is flat parallel to the floor!

The ceiling panels, looking from the lounge room/bathroom corner.


The ceiling panels, looking from the lounge room/bathroom corner; different setting.

I believe this was the first use of palings in the house. We have never regretted it in any way.

The ceiling panels, from within the dining room over by the cabinet.


The ceiling panels, looking from the lounge room.

Yes, those are the leadlights you're supposed to be ignoring. Obviously they lead into an room above the Dining Room, so I'll just finish up by telling you how we completed the ceiling.

Palings look great - but many of them are not up to bearing an adult's direct weight. (Not by the time we get them.) Distributed weight is a different matter, however. After laying black plastic (and tacking it with staples) on top of the palings, we screwed down sheets of plywood. Four, to be exact, and all lifted into the room before we closed the last section of ceiling.

And plywood the floor remains, to this point. By the time we added furniture (hold your horses, you'll see!) little of the floor could really be seen, so it has not been seen necessary to do more with it, though paint and tiles (conventional ones) have been suggested.

However, the Attic is a different story and a different post ...

Tiling...With A Twist

Posted: Tuesday, July 6, 2010
November 7th. Time to level the floor between old bathroom area, current lounge area and current kitchen. Time to create a room.


Llick chipping little pink tiles off the floor where the veranda used to be.
 Llick takes her turn at the jarring end of the crow-bar, chipping horrible pink tiles off what used to be the outdoor veranda floor, preparatory to creating our own tiles.


Slick installs the frame for our new floor.


Long shot of the floor looking east, away from the current kitchen.
Framed up. Notice that the floor-frame ends between the green drill and the vacuum? We decided to move the wall behind the vacuum forward to the edge of the just-installed floor frame, making that section of floorspace (that the vacuum is on) part of the kitchen-to-be. Confused? Don't worry, it should all become clear eventually. Maybe...


Long shot looking toward the kitchen this time.
Looking the other direction. We were wrapping the timbers in plastic to protect the pre-applied finish from the concrete and mess. It was annoying. Notice how the floor drops suddenly in the foreground and then slopes steadily away to the furthest corner? I guess, since the bigger section used to be a veranda, they wanted the drainage more than a level surface.


Low shot of the end of the room opposite the kitchen, where the bathroom used to be.
This photo shows the higher level, where the bathroom used to be. (The hole in the middle ground was the sink drain.)


Beginning to mix the concrete for the floor.
New tiles, here we come. Yes, you are seeing a pile of gravel in the house, and no, we aren't kidding. We were about to create concrete tiles, divided by finished treated pine timbers, for our dining room floor.

This floor, if it worked, would accomplish several things: It would be a great for collecting heat in winter, being on the north face of the building and under big windows, or deliciously cool in summer, since it heats slowly; it would provide another visual cue to delineate the room; it would provide a reasonably sensible and hopefully hard wearing surface for a dining room; and it would be a floor that we could create ourselves without too much trouble or expense.


Mixing the gravel up and spreading about within each square.
Mixing and spreading on the spot. Gravel, sand, cement, oxide for colour and water.


Each square leveled with cement mixture.
Fun stuff! Adult mud pies...


And a surprise ending, just to finish off, because guess what? We didn't take photos of the finished product! By next post (which should this time be much sooner than six months hence) I will hopefully have some pics of the finished floor.

RoofSpace Dilemma

Posted: Thursday, December 31, 2009
A few days after the happenings of the last post, Slick opened up the empty ceiling space over the dining room. The kitchen question had been decided, but the dining one remained. In other words, the whereabouts of the kitchen-to-be had been resolved, but whether to have a cathedral ceiling over our eating area had not.

The eventual destination of the kitchen was to be, technically, over the area previously occupied by the toilet room. This satisfied council requirements regarding preexisting plumbing, while also allowing us to use the 'pink bedroom', or north eastern corner room for our eventual kitchen. (May I just add that we are all SO glad that this is the way it worked out. The abundance of natural light in that kitchen is such a joy.) A wall, it was therefore decided, would be erected basically where the original wall had divided the toilet room from the shower/vanity room, partially cutting off the kitchen from the dining room area. The stove would stand on the concrete slab left over from the toilet room.

Part our deliberations regarding the dining room involved our wish to work with the principle that different ceiling heights help subtly divide spaces and indicate their uses. The theory was that if we had a higher ceiling above the dining room, it would delineate that area as different and separate from the lounge room. Another aspect we were juggling was energy in the forms of light and heat. If you remember reading an old post on the ideas and plans (read 'Exterior Philosophies') we had in the early days, you will recall that we played with the idea of lifting the roof height all along the ridge pole and putting in a second story. Like so:

A sketch of a possible barn-like house profile.
But by this time we knew we didn't have the time and money necessary to make this possible. We had not, however, ruled out putting windows in the gable to let extra light and heat through. We were already decided that the concrete floor of the dining/bathroom area was an ideal passive solar heat sink, so more windows seemed a good idea. However, several considerations had to be taken into account. The biggest was represented by the major beams running the nearly the width of the building. Structurally, a cathedral ceiling was impractical. We also worked out that not much usable light could be collected through the gable.

Slick preparing to climb a ladder.
(Above and below): Slick opening up the ceiling over the dining room.
 Slick working up the ladder.
 
As can be seen above, the only remaining ceiling area is above where the toilet room was.

 
Home education within a home renovation.
 
The show must go on.
 
And then someone brought up the idea of an attic area, again. Why not go the opposite direction from a cathedral ceiling and instead drop the ceiling height over the dining room, granting just enough height for a legal (and maybe even usable) room above? This was a prospect most beautiful and dazzling to our entire romantic, space-starved family. In fact, the idea captured our hearts, but also made its discussion the more stressful. Some considered the idea just romantic, wishful, impractical thinking; most thought it wonderful and didn't really care about practical details as they essentially weren't their problem; others thought it a great idea and overflowed with creative ways to make it work (some of which were cause for some anxiety). The main problem with the attic idea was the necessity of access - ie, a staircase - and the distinct lack of floorspace. A spiral staircase was the most popular suggestion, but then where on earth would we put it? Put it underneath the attic and there would hardly be any floorspace upstairs; put it out in the lounge and it would majorly interrupt traffic flow and visual continuity. As principles, practicalities and personal wishes mixed within the key players, stresses mounted with each discussion. But gradually we worked it through and some decisions came to be made.

Firstly, we decided to scrap the cathedral ceiling idea and instead lower the ceiling to about the height of the top of (what was then) the current doorway beam. (See photo above.)

Secondly, we decided to frame the extended dining room (which would include all the previous bathroom area except the toilet room) with post and beams, helping to delineate that area as separate from the lounge and kitchen. This post and beam theme would also be used in framing doorways between the lounge room and other areas.

Thirdly, we decided to level off the floor surface of the dining/old bathroom area, transforming it into one room.

Fourthly and finally we decided to build in an attic above the dining room, accessed by a winding staircase to be installed at the end of the dining room, a space at that time occupied by the kitchen doorway. The kitchen/bedroom-to-be would subsequently be accessed through a door set in under the stairs (the family rejoices once more - are we not sad creatures?).

So there you go. Now you know how some of our most momentous decisions were made and a little bit about why they were made. Hopefully it makes some sense. Make sure you comment if it doesn't because I have many more posts ahead, and thus many more opportunities to explain things.

Bathroom Makes Progress

Posted: Tuesday, November 17, 2009
 Bathroom through door [left view].
Plastering. Oh what joy. One, incidentally, that I had not yet experienced. However, my sister, Blick, sweated out most of her plastering apprenticeship in this room.

 Bathroom through door [right view.]
This room is a monument to her perseverance and resultant skill. It was not an easy room to begin a plastering career in.

Normally the installation of cornice along the top of the wall means that the plasterer doesn't have to concern himself with the join between the ceiling and walls. It is all covered up. However, as we were creating and plastering our cornice ourselves, the plasterer of this room had three horizontal right-angle corners to deal with on top of the four vertical ones. Two concave and one convex. The final surfaces of that cornice consist almost entirely of applied plaster, I am sure. The original gyprock was but the skeleton awaiting flesh!

However painful, the creation of this different cornice effect was necessary and, indeed, attractive in the end. As can be seen, at this point the cornice has been created and half plastered on all four walls. The intrusion of the beam above the door is now invisible. Voila! Three identical replicas built, and the original problem has disappeared.

   Bathroom, looking toward door.
Here you can see that the shower base and tiled 'back' are installed. Two narrow glass panels and a glass door will complete it. The door is destined to angle across the front corner, saving room.
  Bathroom, looking toward door [2].Yes, our shoddy old 'kitchen' lights are still our source of artificial light in the bathroom. Not long after, the electrician came and installed one of those three-in-one things, consisting of heat lamp, fan and normal light. He also installed a wall bracket light over the bath.
 
 Blick, Klick, Alick and Glick polishing the bath.
And this is the bath. A bath with a history.

One day Mum and Dad headed off to buy a free-standing cast iron bath. Of course, our almost non-existent budget was boasting it's customary several thousand less than several thousand dollars, so second-hand was our only option. Wandering amongst old baths galore, her keen eye on sharp lookout, our aesthetics director could find nothing suitable. That is, none except that ancient bath way down the back, full of ash and rubbish, rusted beyond belief and apparently leg-less.

Lets be blunt: it was a wreck. But, it had the Right Shape. Slick put to use the haggling skills he'd learned in Mexico so many years ago, and bought it. Are we crazy? Well, judge by the photo above.

Did you know that a glossy enamel paint is applied to trains? No? Neither did we, till we started researching places that might re-coat our bath in enamel. It's true, though, and that is what now covers our bath.

It wasn't quite as straight-forward as just rocking up to somewhere for a spray job, unfortunately. First the bath had to be laboriously scraped by the team as someone had hand-painted the bath - and it hadn't worked. At least it showed us how pointless that avenue of endeavour would be. All that paint had to be taken off and even chisels were out before the end. Paint removed, we hauled it in to the enamelers and left it, waiting for the call that would let us know they'd found time for it. The call finally came and we picked it up (including the four odd legs - nothing like a bit of eccentricity!), lugged it home and polished it with the special cloths that were provided. This took off the last tiny nibs.

Finally we heaved into place, connected the plumbing and stood back to admire our new bath.

To be quite honest, our bath isn't the same as your average several-thousand-dollar new cast-iron bath. The enamel is thinner than the original enamel, as our enamel is a two-part paint product. This has meant, in practical terms, that it is much easier to chip or scrape the finish on our bath. Two years later and our bath now bears small scars from clumsily handled metal plugs and various other accidents, but it is certainly in full working order.

First Renovation Anniversary

Posted: Thursday, October 1, 2009
On April 11th, we celebrated one year's ownership and development of 'Lizard Rock'.

 Llick holding up the anniversary cake
Llick holds up the cake (probably made by someone other than Mum, judging by the lack of height). We are dining in the area that used to be veranda till we installed the windows, clad the outer and took out the inner sliding doors. The bathroom is still on the other side of the plywood behind Mum. Do you see the stains at the bottom of that wall? Water from the shower on the other side sometimes leaked through and drained away under the window.

 The clad laundry wall.
And on the same day this photo was taken of the shed/laundry wall, opposite the kitchen. As you can see, not only is it clad, but at some time during the last three or four months Slick has installed a new door and two new windows. But more on this project later.

The renovation had been hard - emotionally, physically and mentally - but it was wonderful to contemplate what we had managed to accomplish, by the grace of God, on an almost non-existent budget. The application of much hard labour, time, initiative and innovation, combined with some skill, to materials from the local dump, various jobs, friends and a unexpected places, gave us results that many people pay much money for. It would have been much easier to take out a loan, but we were determined to use our skills and the materials available and to come out the other side beholden to no-one. We saw this house as our God-given opportunity to work our way further out of morgage debt. Once finished, we planned to sell it and move straight on. As it turns out, two years later, we have not yet arrived at the right time to sell. The house has been on the market, and then been taken off. But I am jumping far ahead of myself. Look out for the upcoming laundry post!

Easter Display - Preparation

Posted: Wednesday, September 30, 2009
I know this post really doesn't have anything to do with the renovation, but if you keep your eyes peeled you'll see bits of the shed, house and front fence.

At our previous address, the people on our street used to decorate their houses and hold a street party in December. We never bought into the whole 'christmas lights' thing. Instead, over our fifteen years stay on that street, we devised nearly fifteen different displays for our front yard. From a simple paper mache snowman (eminently ironic in our blisteringly hot Aussie christmas season), to the complexity of Rachael's Tears (strong political comment), each and every one of these displays had a message. Some were obvious, others subtle; all of them pushed people to re-evaluate, re-asses, re-think. Maybe change.

This year, we might be in a completely different location and season, but we (that is to say, Slick) decided to take advantage of our street exposure and carry on our tradition. We believe that absolute Truth exists and is so important that it should not be concealed, but revealed for all - whether comfortable for people or not.

It was Thursday the fifth of April. The next day would be so-called 'Good' Friday, the day on which Christians officially remember Christ's death. Inspired by God and orchestrated by Slick, we set out to portray two scenes: Christ's dead body in the tomb and, three days later, the lack of Christ's body in the tomb.

  Slick on the ground, enclosed in chicken wire up to his chest
First we wrapped Slick snugly in chicken wire. Recycled, of course. (Did you doubt it?)

By the way, notice the stack of recycled palings leaning against the shed? They have been taken off the hands of a local fencer (still in panels), disassembled, de-nailed and stacked, and are currently waiting to be turned into new fence panels.

 Slick still on the ground
Looks a bit weird, hey? A friend arrived at a slightly later stage (when he had his hands crossed over his chest), walked down the drive from an angle behind Dad's head and just about freaked out. She saw us all standing and kneeling around a body on the ground and thought he'd had a collapse or something. It was kind of funny because it was an unexpected reaction and yet a close interpretation of the scene we were creating. At least, it was amusing to us because we have a warped sense of humour.

 empty wire cocoon half draped with white cloth
Looks kind of freaky, even though you can tell it's just a wire frame.

 Slick and young ones looking down at half-made angel wings
Slick and the younger three did the angel wings, which involved a take on an old Slick-developed artistic technique. Rather than creating wire frames, as we have in the past, and semi-melting plastic for the outer covering, Dad used branch off-cuts and the same plastic wrap he used on the stone pillars. (We had used our only chicken wire on the body, you see, and didn't have much plastic hanging round, either.) Necessity is the mother of invention, they say, and it has certainly proved so to us many a time.

Notice that there are new windows installed in two of the laundry walls and that most of the nearest wall has been clad?

 The wire cocoon, this time fully draped with cloth

 Click, Blick, Klick and Glick standing at the head of the wire frame, beginning to wrap it with strips of cloth
On to the next stage: The Wrapping of the Body (with strips of a not-too-stained drop-sheet). Each strip was glued down, but not with a strong glue. This body was to become a life-size representation of Christ's dead body in the tomb.

 Slick standing behind the front fence, leaning a plaster head stuck to a pole over the top
Slick positioning the first angel's head. This head is plaster, hand carved by Dad for one of our past Christmas displays. Most things from past displays haven't ever lasted more than two years, but this head and another are truly works of art that can and will be preserved. This head was put on the pole for this specific purpose.

You can see, by the way, that some progress has been made on the fence. The front gate used to swing to the left of these panels.

Part Two of the Easter installments coming soon.

Property Named

Posted: Monday, September 28, 2009
At the end of January, 2007, we officially put up the name of our property. It all started when we were given two sandstone pavers recycled from a neighbour's garden. Alone, they were useless - big and heavy, but not interesting or large enough to be much use in the general way. Slick's natural creative innovation got to work, and soon he had transformed them into pleasing objects that were of practical use, added romance, interest and value to the front presentation of the property, and which could only improve with time.

Property name carved into sandstone rectangle: 'Lizard Rock'

  Three foot long carved lizard and individually carved out '79' attached to the front (sandstone) dry stone retaining wall

Clever, ain't he?

Finishing the Handrail

Posted: Thursday, September 24, 2009
Slick strips the bark off our eucalypt sapling handrail. It is January 3rd, 2007 and hot.


It is quite an eye-opener to the lay person, how many uses skillful hands can put a shovel to (though it is sometimes necessary to sharpen it first).


Unique Washing Line

Posted: Tuesday, April 14, 2009

How many people do you know that have used their volleyball net as a washing line? There are nine of us - sometimes the hills hoist just doesn't hold enough! Now we have an extra clothesline, and the net is retired.

Actually Mum really didn't like using the net, and it didn't last terribly long. It was good for socks though: see those white and coloured blobs that appear almost to be hanging in mid air? That's what they are.

(Picture taken July 28th, 2006)