Skeleton Staircase

Posted: Monday, July 26, 2010
A thousand years ago, or seven months, or whatever it was, I posted RoofSpace Dilemma in which I briefly touched on the trauma we worked through to make key decisions centering around our use of space to create a Dining Room and Attic. These were hard decisions to make when we had little more than our imaginations to work with. It was difficult to imagine not only the final appearance but the usability, the coherence with the rest of the house and the effect on traffic – and thus use of rooms.

The decision to build a winding staircase that tucked into the end of the dining room had many points against it, at first glance. The biggest perceived problem with the whole idea was the low entry point between attic edge and ceiling. The maximum height there is about 3’ 8” (1 metre or so). But it was argued that as the attic wasn’t exactly generous in height at in any area, and would thus be most likely used for a storage area or – better – a kid’s room, a small entry point could almost be counted more an attraction than detraction. The idea of developing the room for kids actually turned that issue into a positive point.

Then we began calculating, and we realised we had to address another potential problem: the height we had to span versus the length of space we had available, versus the local council regs regarding staircase grades. These were crowding each other so much that at first they seemed the write the staircase off. But once we added winder steps in, top and bottom, instead of calculating in terms of one straight flight, it began to appear possible again. There were protests about how steep the stairs would be, but these were overruled with the reminder that we were developing this with kids in mind and that a balustrade down the side and a bar across the window at the bottom would make it quite safe. The narrow dimensions were also predicted to make things manageable.

And then the question of access into the room behind arose. A door under the top of the staircase was immediately suggested by one of the more romantically minded, but it took some very practical fast talking to persuade the builder of this idea’s sense and potential.

As no other staircase option beat this one, the Winding Staircase was begun.

The staircase framed in on one side.
At the end of November, 2007, Slick began framing up.

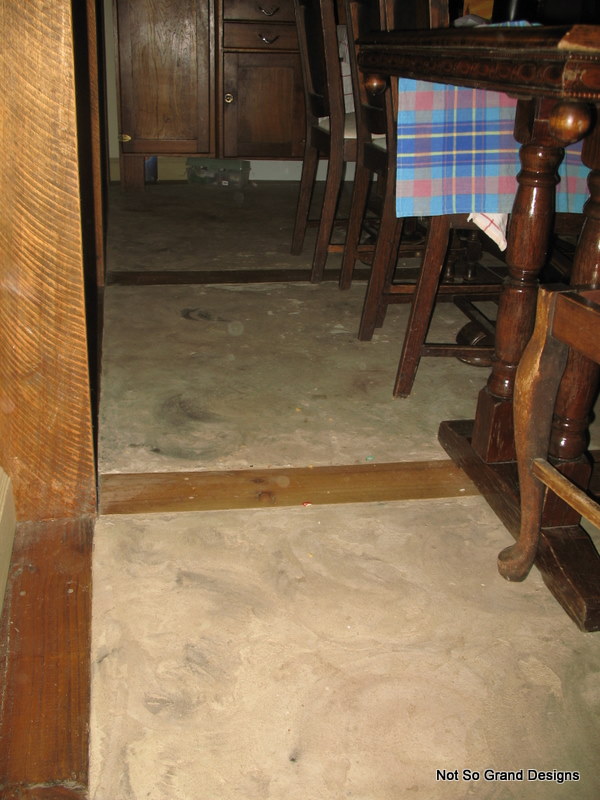
The above photo was taken from within the existing kitchen, facing out into the dining room. (This is a good example of the few pics I have of the tile floor while it was still new.) The location of the future top winders, or corner stairs, is made visible by the diagonal timber, while the bottom winders can just be glimpsed to the left hand of the photo. (Winders are those triangular stairs that step up as they wind around a central point, such as on a spiral staircase.) The new doorway comes through the left hand wall, under the highest part of the stairs. (The pale corner of the threshold can be seen contrasting with the pine floorboards.)

Then a month passed. I believe we were very busy as a family (being the big Aussie end of school year / Christmas lead up) and that Dad had a lot of work on. For whatever reasons, the next photos in the record that relate to stairs don’t appear for another month. At this point the pressure was beginning to be felt. Not only were we expecting a friend to be staying overnight on Christmas Eve, we were also looking forward to Dad’s parents arriving from Canada soon after Christmas to stay for a month or so. You remember our house plan and the size of our family? Nine people in a little two bedroom house in the midst of a full-blown renovation doesn’t leave much space or sanity. The prospect of two more was a spicy challenge.

But, with just that little extra space that an attic offered, possibilities emerged. We calculated that if we could finish the stairs so we could finish the attic (at least to liveability), we could put Mum and Dad there and give the grandparents Mum and Dad’s bedroom (the only private space in the house apart from the bathroom).

By the 20th of December, the date of the below photo, we were feeling the pressure...

Llick, Alick and Klick in a corner of the newly created attic.
This photo is of Mum standing at the top of the stairs (which I conclude must have been completed since the framing up a month before). I just draw attention to the area around her feet. Her right foot is on the top step/attic floor; beyond her foot is a white area. That is actually looking through into the upper corner of the lounge room!

Blick plastering in front of the staircase.
In this photo the bottom of the completed stairs can be seen. (The bottom three stairs were built a good while before the rest, actually.) As you can also see, gyprock has been put on the face of the stairwell and the power-points are installed and hooked up to electricity. Blick is in the process of plastering.

Slick and Click pause in the midst of lining the cupboard ceiling up in the attic.
I thought it only fair to show you the area the stairs led to! This photo was taken the same day as the photo above, January 7th, 2008. This period was just prior to the Grandparents arriving, so the shelving details were being finished off before we moved Mum and Dad up into their new bedroom. Apart from the shelves and the palings above the shelving area, this is the stage we managed to get the attic to by Christmas Eve, in time for our guest. It had been a close thing, though; I think we had packed up tools an hour or so before we expected him. (And then he forgot to come! Classic anticlimax.)

he top corner stairs, or winders, (looking up from the bottom).
The top winders turning around the top baluster onto the attic floor.

The black plastic ahead was eventually replaced with an unassuming door that now gives us our official access into the roof-space.

On the top right the ceiling can be seen to continue. That area is our storage space, a two metre square area that houses all our spare things – you know, board games, sleeping bags, spare bedding, dress-ups and so-on. The vertical palings on the right are actually one of the two doors that conceal that area, folded down.

Speaking of the ceiling, I’ve no better place to tell you about it since we didn’t see fit to take photos at the time we installed it. Originally (see second photo in this post), there was just bare roof iron (aluminium, actually) and rafters. We tacked foil-backed insulation in between the rafters (foil down) and then black plastic under that. The plastic is to help prevent the fibres of the insulation from coming through. Then over the plastic we stretched the light canvas and fastened it in place by nailing strips of timber down the lengths of the rafters. (This can be seen to better effect in the attic photo.) As the maximum height in the attic is about 5’3”, we had decided a soft ceiling was the way to go. (Yes, sorry, I am Australian, but I think in imperial terms when measuring spaces that are around a person’s size. Put it down to me being half Canadian. In metric terms, about 1.4 metres?) But more on this on my attic post, perhaps.

The bottom corner stairs, or winders, (looking down from the top).
Hope you don’t suffer vertigo!

I’m so glad we did install that window at the bottom of the stairs, hazard or not. It not only sheds constant light on the stairs, it also helps keep the air moving (especially in summer!) and creates a lovely sunny nook that many people enjoy, particularly during winter lunch breaks.

I expect the lack of balustrade – on top of the steepness and narrowness , plus a window at the bottom – makes the staircase seem rather insecure, to be polite. However, the tightness of space and the attic floor being conveniently to hand combined to make negotiation of the stairs quite comfortable and safe. We were quickly thundering both up and down without a second thought. We became so used to it that once the balustrade was finally installed the staircase suddenly seemed almost claustrophobic! Socks were the main security risk. (But no serious injury to date.)

The staircase from the bedroom behind – with Tlick in the foreground, daubing glue on the frame wall preparatory to screwing on a sheet of gyprock.
Showing you the other side of the staircase – the side sticking into the room that had been a kitchen, and in fact was still the washing up area. (The stove and everything was already over in the new kitchen.) Eventually, though, this room was to become a bedroom. By the way, the photo was taken to record Tlick putting up gyprock after having insulated the bathroom wall. The no-more-nails glue is, strictly speaking, unnecessary; however, as we always say, ‘Better safe than sorry’! Plastering isn’t that fun.

A wide shot of the stairs from the dining room.

 Grandma and Llick painting.
Grandma and Llick painting.

Looking past the bathroom door and through the recently created doorway beneath the top of the staircase: Blick, plastering the underbelly of the staircase.
Aha! And this photo, taken January 31, features Blick, plastering the underbelly of the staircase. Blick learned to plaster on this staircase/room, probably the most difficult area to plaster in the house. She deserves a medal for perseverance, if nothing else.

I wanted to show you how the doorway works with the staircase. As you can see, the stairs overlap the doorway by two thirds and the horizontal surface (the bit Blick is working on) doesn’t extend far before angling down. This meant that the door ended up hung so that it opens outward and lies flat along the wall to the right. (And that reminds me: the doorway is actually narrower than is conventional, so a door was custom made for the space. In design it is similar to the bathroom doorway.)

The bottom of the staircase underbelly ends in a little storage area under the bottom winders. This we’ve mainly used for storing the vacuum.

And that’s it! You are officially introduced to our Winding Staircase.

Dining in Style - Floor and Ceiling on Display

Posted: Tuesday, July 20, 2010
Well, here are my photos of The Tiles. Since I just took them, you'll have to keep in mind that there is a leap of three years happening between posts. (So things like stair wells and light fittings and tiny little leadlight windows into upper levels and such will have to be ignored!)

The floor from the lounge room/kitchen corner.


This floor was actually refinished about eighteen months ago because the original concrete crumbled heavily around the edges - especially along the join between concrete and timber that can be partially seen in the lower left corner of the above photo. Traffic over these two tiles is particularly high. But we refined our technique, innovating boldly, as usual, and used a large proportion of tile cement. This cement has much more flexibility and has consequently worn much less. The pale blotches that can be seen in the above photo are areas that we will soon patch again, but they are nothing in comparison to the first time round. These ones have been caused mainly by regular scraping by chair legs.

The floor before the big front windows.

From three years on, I guess it is appropriate to report that the concrete has really worked well all round (even if it did have some hitches at first). It is always a little cooler than anywhere else in summer, yet it is usually warmer than the timber floors in winter even after a night without a fire. (And the temperature can drop to minus seven in winter here. Mind you, not inside our house - any more.) The tiles have also worked reasonably well for a high traffic, hard wearing zone and for an eating area. Occasionally we've had to scrub a bit more to get food substances off, the concrete being more porous than your average linoleum, and it can be quite dusty. However, it absorbes moisture faster than our polished timber floors and can be classified overall 'easy maintenance'. Three cheers for Slick's innovative Tiles!

The floor in front of the windows looking toward the kitchen.


I thought I would also take the opportunity to show you the ceiling of the Dining Room, as we failed to take any photos at the time of construction.

Consisting entirely of untreated old palings, the neutral greys create a quietly dramatic contrast to the oiled post and beam framework.

I hope you don't get sea-sick looking at the photos. Often this ceiling attracts attention because of the tricks the pattern can play with people's perception. Despite appearances, the ceiling truly doesn't go up and down; it really is flat parallel to the floor!

The ceiling panels, looking from the lounge room/bathroom corner.


The ceiling panels, looking from the lounge room/bathroom corner; different setting.

I believe this was the first use of palings in the house. We have never regretted it in any way.

The ceiling panels, from within the dining room over by the cabinet.


The ceiling panels, looking from the lounge room.

Yes, those are the leadlights you're supposed to be ignoring. Obviously they lead into an room above the Dining Room, so I'll just finish up by telling you how we completed the ceiling.

Palings look great - but many of them are not up to bearing an adult's direct weight. (Not by the time we get them.) Distributed weight is a different matter, however. After laying black plastic (and tacking it with staples) on top of the palings, we screwed down sheets of plywood. Four, to be exact, and all lifted into the room before we closed the last section of ceiling.

And plywood the floor remains, to this point. By the time we added furniture (hold your horses, you'll see!) little of the floor could really be seen, so it has not been seen necessary to do more with it, though paint and tiles (conventional ones) have been suggested.

However, the Attic is a different story and a different post ...

Tiling...With A Twist

Posted: Tuesday, July 6, 2010
November 7th. Time to level the floor between old bathroom area, current lounge area and current kitchen. Time to create a room.


Llick chipping little pink tiles off the floor where the veranda used to be.
 Llick takes her turn at the jarring end of the crow-bar, chipping horrible pink tiles off what used to be the outdoor veranda floor, preparatory to creating our own tiles.


Slick installs the frame for our new floor.


Long shot of the floor looking east, away from the current kitchen.
Framed up. Notice that the floor-frame ends between the green drill and the vacuum? We decided to move the wall behind the vacuum forward to the edge of the just-installed floor frame, making that section of floorspace (that the vacuum is on) part of the kitchen-to-be. Confused? Don't worry, it should all become clear eventually. Maybe...


Long shot looking toward the kitchen this time.
Looking the other direction. We were wrapping the timbers in plastic to protect the pre-applied finish from the concrete and mess. It was annoying. Notice how the floor drops suddenly in the foreground and then slopes steadily away to the furthest corner? I guess, since the bigger section used to be a veranda, they wanted the drainage more than a level surface.


Low shot of the end of the room opposite the kitchen, where the bathroom used to be.
This photo shows the higher level, where the bathroom used to be. (The hole in the middle ground was the sink drain.)


Beginning to mix the concrete for the floor.
New tiles, here we come. Yes, you are seeing a pile of gravel in the house, and no, we aren't kidding. We were about to create concrete tiles, divided by finished treated pine timbers, for our dining room floor.

This floor, if it worked, would accomplish several things: It would be a great for collecting heat in winter, being on the north face of the building and under big windows, or deliciously cool in summer, since it heats slowly; it would provide another visual cue to delineate the room; it would provide a reasonably sensible and hopefully hard wearing surface for a dining room; and it would be a floor that we could create ourselves without too much trouble or expense.


Mixing the gravel up and spreading about within each square.
Mixing and spreading on the spot. Gravel, sand, cement, oxide for colour and water.


Each square leveled with cement mixture.
Fun stuff! Adult mud pies...


And a surprise ending, just to finish off, because guess what? We didn't take photos of the finished product! By next post (which should this time be much sooner than six months hence) I will hopefully have some pics of the finished floor.

Post and Beams

Posted: Monday, January 4, 2010
These photos were taken on the same day as the photos displayed in the previous post. It was the first of November, 2007.

In the above photo, taken from the lounge room, you can see the beginning of the process we were undertaking. Slick had measured and cut all the posts and beams, and screwed down the posts along the window wall. Up on our new scaffolding rested the long beam that would soon sit in its place on top of those posts. This beam, though it is hard to see in these photos, has holes cut ready for the shaped ends of the cross beams.

Click and Slick sitting on the scaffolding. (Above) Here Slick and I look as though we are lazing around, but I assure you that it is better to plan rather than rush into something and make stupid mistakes or even get hurt. 'Process, process!' is our catch-cry. Besides, we were psyching ourselves up for the effort ahead!
 Unscrewing the header.(Above) Here I am taking down the header beam that had been over the entryway into the dining room (or verandah, depending on how far back you want to go). As you can see, with the header up, part of the dividing wall remains between dining and lounge area. We had to remove that in order to put in place the new structure.

Showing the first beam.(Above) This time we are looking away from the kitchen, toward the area the bathroom used to inhabit. In the top left of this photo you can see that the long beam is in  place along the top of the windows. The timber on top of the scaffolding is supporting the first cross beam. You can see the shaped 'peg' at the end, ready for the other end beam.

Showing the end beam before it is attached to the cross beams.
 (Above) This photo is looking back toward the new bathroom (door on right) and kitchen (behind curtain on left), along the surface of the lower scaffold platform. The end beam is resting ready to be hammered onto the ends of the waiting cross beams.

 Showing the end beam in the process of being attached to the cross beams.
(Above) The end beam half on.

Showing a close-up of the final result.
(Above) The end result. Thank God for giving us that scaffolding, as it would have been much, much harder and way more dangerous without it.

RoofSpace Dilemma

Posted: Thursday, December 31, 2009
A few days after the happenings of the last post, Slick opened up the empty ceiling space over the dining room. The kitchen question had been decided, but the dining one remained. In other words, the whereabouts of the kitchen-to-be had been resolved, but whether to have a cathedral ceiling over our eating area had not.

The eventual destination of the kitchen was to be, technically, over the area previously occupied by the toilet room. This satisfied council requirements regarding preexisting plumbing, while also allowing us to use the 'pink bedroom', or north eastern corner room for our eventual kitchen. (May I just add that we are all SO glad that this is the way it worked out. The abundance of natural light in that kitchen is such a joy.) A wall, it was therefore decided, would be erected basically where the original wall had divided the toilet room from the shower/vanity room, partially cutting off the kitchen from the dining room area. The stove would stand on the concrete slab left over from the toilet room.

Part our deliberations regarding the dining room involved our wish to work with the principle that different ceiling heights help subtly divide spaces and indicate their uses. The theory was that if we had a higher ceiling above the dining room, it would delineate that area as different and separate from the lounge room. Another aspect we were juggling was energy in the forms of light and heat. If you remember reading an old post on the ideas and plans (read 'Exterior Philosophies') we had in the early days, you will recall that we played with the idea of lifting the roof height all along the ridge pole and putting in a second story. Like so:

A sketch of a possible barn-like house profile.
But by this time we knew we didn't have the time and money necessary to make this possible. We had not, however, ruled out putting windows in the gable to let extra light and heat through. We were already decided that the concrete floor of the dining/bathroom area was an ideal passive solar heat sink, so more windows seemed a good idea. However, several considerations had to be taken into account. The biggest was represented by the major beams running the nearly the width of the building. Structurally, a cathedral ceiling was impractical. We also worked out that not much usable light could be collected through the gable.

Slick preparing to climb a ladder.
(Above and below): Slick opening up the ceiling over the dining room.
 Slick working up the ladder.
 
As can be seen above, the only remaining ceiling area is above where the toilet room was.

 
Home education within a home renovation.
 
The show must go on.
 
And then someone brought up the idea of an attic area, again. Why not go the opposite direction from a cathedral ceiling and instead drop the ceiling height over the dining room, granting just enough height for a legal (and maybe even usable) room above? This was a prospect most beautiful and dazzling to our entire romantic, space-starved family. In fact, the idea captured our hearts, but also made its discussion the more stressful. Some considered the idea just romantic, wishful, impractical thinking; most thought it wonderful and didn't really care about practical details as they essentially weren't their problem; others thought it a great idea and overflowed with creative ways to make it work (some of which were cause for some anxiety). The main problem with the attic idea was the necessity of access - ie, a staircase - and the distinct lack of floorspace. A spiral staircase was the most popular suggestion, but then where on earth would we put it? Put it underneath the attic and there would hardly be any floorspace upstairs; put it out in the lounge and it would majorly interrupt traffic flow and visual continuity. As principles, practicalities and personal wishes mixed within the key players, stresses mounted with each discussion. But gradually we worked it through and some decisions came to be made.

Firstly, we decided to scrap the cathedral ceiling idea and instead lower the ceiling to about the height of the top of (what was then) the current doorway beam. (See photo above.)

Secondly, we decided to frame the extended dining room (which would include all the previous bathroom area except the toilet room) with post and beams, helping to delineate that area as separate from the lounge and kitchen. This post and beam theme would also be used in framing doorways between the lounge room and other areas.

Thirdly, we decided to level off the floor surface of the dining/old bathroom area, transforming it into one room.

Fourthly and finally we decided to build in an attic above the dining room, accessed by a winding staircase to be installed at the end of the dining room, a space at that time occupied by the kitchen doorway. The kitchen/bedroom-to-be would subsequently be accessed through a door set in under the stairs (the family rejoices once more - are we not sad creatures?).

So there you go. Now you know how some of our most momentous decisions were made and a little bit about why they were made. Hopefully it makes some sense. Make sure you comment if it doesn't because I have many more posts ahead, and thus many more opportunities to explain things.

Erasing Bathroom Tracings

Posted:
Well, we may not yet have decided one way or another where the kitchen was or wasn't to be, but fiberglass fibers from old ceiling insulation still needed to be blocked off from the air we breathed, walls still needed to be plasterboarded and the ceiling support issue had to be resolved. The renovation went on.

Wedging the ceiling supports in.
The most important job was keeping the ceiling propped up. I'm sure you can imagine why. The second most important thing was sealing off the ceiling - with spare sisalation in the bathroom area and black plastic in the dining room. The black plastic had already been up but was now replaced temporarily. The usual unhealthy effects attributed to breathing fiberglass fibers and dust would have been worse in a family containing at least three asthmatics.

Looking through the dining room from the kitchen.
The view from the kitchen toward where the bathroom had been can be seen above. The books and various paraphanalia that the dinner table is bearing up under was all mostly cleared off the as-yet-unmoved crockery cabinet that can be espied in the distance.

Cutting gyprock in the dining room, preparatory to cladding the wall.
In this photo (above), we have begun cutting the second-hand gyprock to fit the wall we are facing. As neither Dad nor I enjoy this job, I'm afraid we weren't very cheerful. 

 Fitting in piece of gyprock.
However, we got through it. And it looks good when done. At least, it does after living with black plastic for months, I assure you.

It is surprising how easily one becomes used to the look and doesn't notice it after a while. Until, that is, one entertains visitors and notices with re-sensitized eyes the eyesore it really is. Not that we left our walls unplastered and unpainted out of laziness or choice, but lack of resources and time did mean that we lived with this state of affairs for some time.

Bathroom Demolition - Days 2-3

Posted: Wednesday, December 30, 2009
Next morning (after the events documented in the previous post), Slick removed the plumbing and began to take down the wall. Porch/dining area and bathroom were about to become one.

Slick pulling the plumbing off the walls.
Isn't the morning sunlight flooding through that window glorious? It was especially so to us, having used that room almost entirely by artificial light for most of the past eighteen months. Below, at the beginning of Day 3, Alick can be seen sweeping the floor after Slick had taken down the plywood wall. In the photo on the right, if you look through the wall frame, through the dining room and past the fridge, you can see Llick in the kitchen. Since we closed off the original entry into the kitchen by putting in the new bathroom, we had to make that opening through to the kitchen. It was much more convenient for transferring food onto the table, however.

Alick running out of the bathroom with a broom in her hands.Alick sweeping the bathroom floor.


 Slick removing cornice previous to removing a large piece of gyprock.
  The large top piece of gyprock, from the wall between the bathroom and lounge room, being lowered to the floor.In the above photo, the last piece of gyprock is coming down, opening up what was the bathroom to the lounge area. As you can see on the left, nobody has yet worked up the energy to empty and move the crockery cabinet.

The pile of pale blue pottery shards that used to be a toilet. Slick removing the gyprock from between the toilet room and the main bathroom.


You will see in the above photos that Slick is opening up the toilet room, too. The toilet,as seen on the right, is no more. Its stained ugliness dictated a swift and effective end. Somebody had fun.

 Slick stands with one finger out to catch a large piece of ceiling gyprock that is hanging only by its taping join.
 Ah, never say we don't have fun - every now and again. This piece is obviously part of the ceiling, which was destined - one way or another - to change. At this stage we were still undecided whether to create a cathedral ceiling over the dining room, or somehow fit in a little attic. If fact, we were also playing with the idea of putting the new kitchen in this bathroom/toilet area - a new idea for us. Up to this point, we had been planning on putting the new kitchen in the big room on the south east corner of the house; however, council regulations had made things complicated. We had by this stage discovered that, unless we spent the large, precious quantities of money and time necessary to lodge a development application, we could only put bathrooms and kitchens in areas that contained existing plumbing. We got away with moving our bathroom because it was put in the kitchen; we now knew we would be able to legally move our kitchen, as long as we put it where the bathroom had been. The question now was, How can we fit within the council regulations and at the same time make this work for us within the plan of the house? How can we put the kitchen where the bathroom was, yet make it an efficient and usable space?

 Slick moving the just-removed gyprock out of the room.
As you can see, the space was not large. Not for a kitchen for a family of nine. If you also look back up at the photo taken from the lounge room and imagine the pink room beyond as another living room, it will become obvious that putting the kitchen in where the bathroom had been would also create a bottleneck between one half of the public living space and the next. All these things and more we pondered in between our progressive deconstruction of the old bathroom. To discover our eventual resolution of these issues, you'll have to wait on coming posts!